- Преподавателю
- Иностранные языки
- Тексти для спеціальності Хлібні вироби для вищих навчальних закладів
Тексти для спеціальності Хлібні вироби для вищих навчальних закладів
| Раздел | Иностранные языки |
| Класс | 12 класс |
| Тип | Конспекты |
| Автор | Самойлова В.В. |
| Дата | 14.02.2016 |
| Формат | doc |
| Изображения | Есть |

Text 1. Apple Cheese Sponge
 Apple Cheese Sponge Cakes are delicious, fluffy, moist and look colorful. Not a difficult recipe to make, anybody can try it at home. Apples and cheese are a traditional combination in both sweet and savory dishes.
Ingredients:
100 Gram Butter (4 oz)
100 Gram Self raising flour (4 oz)
Pinch Salt
75 Gram Caster sugar (4 oz)
100 Gram Red Leicester cheese, diced (4 oz)
1 Egg, beaten
2 Tablespoon Milk
150 Gram Cooking apples (6 oz)
450 ml Custard, to serve (1 1/2 pints)
Melt the butter in a saucepan.
Mix flour, salt, sugar and cheese in a bowl. Add butter, egg and milk. Mix well. Peel, core and dice apple. Add to the mixture.
Pour into a greased loose-bottomed 20 cm (8 inch) cake tin and level the surface. Bake at 190 °C / 375 °F / Gas 5 for 30-35 minutes or until risen and golden.
Cool for 5 minutes then remove from tin and place on a wire rack.
Serve warm with custard if desired.
Text 2. Types of dough and its processing.
In the typical small retail shop, most breads are mixed by the straight dough method-that is, all ingredients are mixed in one operation. The dough is then given a bulk fermentation time (that is, until molding and proofing) of 1 to 21⁄2 hours. This is called a short-fermentation straight dough.
A no-time dough is made with a large quantity of yeast, taken from the mixer at a higher temperature (up to 90°F/32°C) and given only a few minutes' rest before being scaled and made up. It is also given a shorter proof. This process should be used only in emergencies because the final product does not have a good texture and flavor.
Long-fermentation doughs are fermented for 5 or 6 hours or longer, sometimes overnight, at a temperature of 75°F (24°C) or lower.The advantage of this method is that the long, slow fermentation greatly enhances the flavor of the product.Some of the best European breads are made this way. The major disadvantage besides being harder on the work schedule is that the
fermentation is harder to control because of fluctuations in temperature and
other factors. Doughs often become overfermented.Therefore, this process is used much less today than in the past.
To avoid the problems of a long-fermentation straight dough but achieve the flavor created by a long fermentation, one can use the sponge method.
Sponge Processes
The sponge process involves a two-stage mixing method. First, a sponge is made of water, flour, and yeast and allowed to ferment.Then the dough is made by mixing in the remaining ingredients.The finished dough may be given a short fermentation, or, if the sponge has had a
long fermentation, it may be scaled immediately, like a no-time dough.
Advantages of the Sponge Method
• Shorter fermentation time for the finished dough.
• Scheduling flexibility. Sponges can usually be held longer than finished
dough.
• Increased flavor, developed by the long fermentation of the sponge.
• Stronger fermentation of rich doughs. High sugar and fat content inhibits
yeast growth.When the sponge method is used, most of the fermentation
is completed before the fat and sugar are incorporated.
• Less yeast is needed, because it multiplies greatly during the sponge
fermentation.
Text 3. Battenberg cake
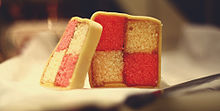 Battenberg cake is a light sponge cake. When cut in cross section, displays a distinctive two-by-two check pattern alternately coloured pink and yellow. The cake is covered in marzipan and, when sliced, the characteristic checks are exposed to view. These coloured sections are made by dyeing half of the cake mixture pink, and half yellow, then cutting each resultant sponge into two long, uniform cuboids, and joining them together with apricot jam, to form one cake. Established variations are for coconut flavouring to the sponge cake and lemon curd or raspberry jam in place of apricot jam.
The cake was created in honour of the marriage in 1884 of Queen Victoria's granddaughter to Prince Louis of Battenberg.
Ingredients:
-
1 cup butter, softened
-
1 cup white sugar
-
3 eggs
-
1/4 teaspoon vanilla extract
-
2 cups all-purpose flour
-
1 teaspoon baking powder
-
1/8 teaspoon salt
-
2 drops red food coloring
-
1 cup apricot preserves
-
2 cups ground almonds
-
3 cups confectioners' sugar
-
1 egg, room temperature
-
1 1/2 teaspoons lemon juice
-
1/4 teaspoon almond extract
Directions:
Cream butter and 1 cup sugar together. Beat in 3 eggs, one at a time. Mix in vanilla. Stir in flour, baking powder and salt gently. Add milk if needed.
Divide batter into 2 equal parts. Add food colouring to 1 part to make a deep pink color. Grease two 7 inch square pans. Spread batters into pans.
Bake at 350 degrees F (175 degrees C) until an inserted wooden pick comes out clean, about 25 to 30 minutes. Let stand in pans 5 minutes. Turn out on racks to cool.
Trim edges from both cakes. Cut each cake lengthwise into 4 strips as wide as the cake is thick. Trim to make strips match. Heat jam slightly. Spread on sides to glue 2 pink and 2 white strips together checkerboard fashion. Spread all 4 sides of completed cake with jam. Repeat with remaining pink and white stripes. Makes two cakes.
To Make Almond Paste: Mix almonds, confectioners' sugar, egg, lemon juice, and almond extract together. Knead until smooth, adding a bit of lemon juice or water if too dry to roll. Add only 1/2 teaspoon at a time. It will be stiff. Divide into 2 equal parts.
Roll 1/2 of paste 1/8 inch or so thick on a surface lightly dusted with confectioners' sugar. Cut to fit length of cake, and long enough to cover 4 sides leaving ends uncovered. Lay cake on one end of paste. Wrap to completely enclose all 4 sides of cake pinching paste to seal. Roll in granulated sugar. Place with seal underneath on serving plate, or store in plastic bag. Repeat for second cake. Chill. Slice thinly to serve.
Text 4. The history of cooking bread.
The history of bread goes back at least 30,000 years. The first bread produced was probably cooked versions of a grain-paste, made from roasted and ground cereal grains and water, and may have been developed by accidental cooking or deliberate experimentation with water and grain flour. Descendants of this early bread are still commonly made from various grains in many parts of the world, including lavashs, taboons, sangaks, Mexican tortilla, Indian chapatis, rotis and naans, Scottish oatcake, North American johnnycake, Middle Eastern pita, and Ethiopian injera. Flat bread of these types also formed a staple in the diet of many early civilizations with the Sumerians eating a type of barley flat cake, and the 12th century BC Egyptians being able to purchase a flat bread called ta from stalls in the village streets.[1] The ritual bread in ancient Greek offerings to the chthonic gods, known as psadista was made of fine flour, oil and wine.
Prehistory
The earliest archaeological evidence for flour, which was likely processed into an unleavened bread, dates to the Upper Palaeolithic in Europe, around 30,000 years ago. During this period of human history cereals constituted just one of many food sources exploited by hunting and gathering; palaeolithic European diets were based mainly on animal proteins and fats. Cereals and bread became a staple food during the Neolithic, around 10,000 years ago, when wheat and barley were among the first plants to be domesticated in the Fertile Crescent. Wheat-based agriculture spread from Southwest Asia to Europe, North Africa and the Indian Subcontinent. In other parts of the world cereals such as rice (East Asia), maize (the Americas) and sorghum (sub-Saharan Africa), which are also sometimes made into bread, were independently domesticated and formed the basis of alternative agricultural systems. Around the world, the shift from varied hunter-gatherer subsistence to agricultural diets based predominantly on a cereal staple such as wheat bread marked an important turning point in human history. Though in many ways nutritionally deficient compared to hunting and gathering, cereal crops allowed agricultural societies to sustain much larger populations than had previously been possible, which in turn led to greater economic specialisation, social complexity and eventually the rise of civilised states.
The development of leavened bread can also probably be traced to prehistoric times. Yeast spores occur everywhere, including the surface of cereal grains, so any dough left to rest will become naturally leavened Although leavening is likely of prehistoric origin, the earliest archaeological evidence is from ancient Egypt. Scanning electron microscopy has detected yeast cells in some ancient Egyptian loaves. However, ancient Egyptian bread was made from emmer wheat and has a dense crumb. In cases where yeast cells are not visible, it is difficult, by visual examination, to determine whether the bread was leavened. As a result, the extent to which bread was leavened in ancient Egypt remains uncertain.
The importance of bread in the formation of early human societies cannot be overstated. From the western half of Asia, where wheat was domesticated, cultivation spread north and west, to Europe and North Africa, and enabled humans to become farmers rather than hunters and foragers. This in turn led to the formation of towns, as opposed to the nomadic lifestyle, and gave rise to more and more sophisticated forms of societal organization. Similar developments occurred in eastern Asia, centered on rice, and in the Americas with maize.
There were multiple sources of leavening available for early bread. Airborne yeasts could be harnessed by leaving uncooked dough exposed to air for some time before cooking. Pliny the Elder reported that the Gauls and Iberians used the foam skimmed from beer to produce "a lighter kind of bread than other peoples." Parts of the ancient world that drank wine instead of beer used a paste composed of grape must and flour that was allowed to begin fermenting, or wheat bran steeped in wine, as a source for yeast. The most common source of leavening however was to retain a piece of dough from the previous day to utilize as a form of sourdough starter.
The idea of a free-standing oven that could be pre-heated, with a door for access, appears to have been a Greek one.
Even in antiquity there were a wide variety of breads. In ancient times the Greek bread was barley bread: Solon declared that wheaten bread might only be baked for feast days. By the 5th century bread could be purchased in Athens from a baker's shop, and in Rome, Greek bakers appeared in the 2nd century BC, as Hellenized Asia Minor was added to Roman dominion as the province of Asia; the foreign bakers of bread were permitted to form a collegium. In the Deipnosophistae, the author Athenaeus (c.A.D.170-c. 230) describes some of the bread, cakes, cookies, and pastries available in the Classical world.[12] Among the breads mentioned are griddle cakes, honey-and-oil bread, mushroom-shaped loaves covered in poppy seeds, and the military specialty of rolls baked on a spit. The type and quality of flours used to produce bread could also vary, as noted by Diphilus when he declared "bread made of wheat, as compared with that made of barley, is more nourishing, more digestible, and in every way superior." In order of merit, the bread made from refined [thoroughly sieved] flour comes first, after that bread from ordinary wheat, and then the unbolted, made of flour that has not been sifted." The essentiality of bread in the diet was reflected in the name for the rest of the meal: ópson, "condiment", i.e. bread's accompaniment, whatever it might be.
Middle Ages
In medieval Europe, bread served not only as a staple food but also as part of the table service. In the standard table setting of the day the trencher, a piece of stale bread roughly 6 inches by 4 inches (15 cm by 10 cm), served as an absorbent plate. At the completion of a meal the trencher could then be eaten, given to the poor, or fed to the dogs. It was not until the 15th century that trenchers made of wood started to replace the bread variety.
Bread was usually adulterated with hazardous materials up to the 20th century, including chalk, sawdust, alum, plaster, clay and ammonium.
Modern era
The industrialization of bread-baking was a formative step in the creation of the modern world. Otto Frederick Rohwedder is considered to be the father of sliced bread. In 1912 Rohwedder started work on inventing a machine that sliced bread, but bakeries were reluctant to use it since they were concerned the sliced bread would go stale. It was not until 1928, when Rohwedder invented a machine that both sliced and wrapped the bread, that sliced bread caught on. A bakery in Chillicothe, Missouri was the first to use this machine to produce sliced bread.
For generations, white bread was the preferred bread of the rich while the poor ate dark (whole grain) bread. However, in most western societies, the connotations reversed in the late 20th century, with whole grain bread becoming preferred as having superior nutritional value while white bread became associated with lower-class ignorance of nutrition.
Another major advance happened in 1961 with the development of the Chorleywood Bread Process which used the intense mechanical working of dough to dramatically reduce the fermentation period and the time taken to produce a loaf. The process, whose high-energy mixing allows for the use of inferior grain, is now widely used around the world in large factories. In total contrast, traditional bread-making is extremely time-consuming, as the dough is mixed with yeast and requires several cycles of kneading and resting in order to become ready for baking, and to produce the desired flavor and texture.
More recently, and especially in smaller retail bakeries, chemical additives are used that both speed up mixing time and reduce necessary fermentation time, so that a batch of bread may be mixed, made up, risen, and baked in fewer than three hours. Dough that does not require fermentation because of chemical additives is called "quick bread" by commercial bakers. Common additives include reducing agents such as L-cysteine or sodium metabisulfite, and oxidants such as potassium bromate or ascorbic acid. Often these chemicals are added to dough in the form of a prepackaged base, which also contains most or all of the dough's non-flour ingredients. Using such bases and sophisticated chemistry, it has been possible for commercial bakers to make imitations of artisan and sourdough breads, traditionally made by semi-skilled laborers working in smaller shops.
Recently, domestic breadmakers that automate the process of making bread have become popular in the home.
Text 5. Cultural and political importance of bread.
As a foodstuff of great historical and contemporary importance, in many cultures in the West and Near and Middle East bread has a significance beyond mere nutrition. The Lord's Prayer, for example, contains the line 'Give us today our daily bread'; here, 'bread' is commonly understood to mean necessities in general.
In Cockney Rhyming Slang, bread means money and is derived from the phrase bread and honey. The word bread is now commonly used around the world in English speaking countries as a synonym for money (as also is the case with the word dough.) The cultural importance of 'bread' goes beyond slang, however, to serve as a metaphor for basic necessities and living conditions in general. A 'bread-winner' is a household's main economic contributor and has little to do with actual bread-provision, for example. This also goes along with the phrase "putting bread on the table." A remarkable or revolutionary innovation is often referred to as "the greatest thing since sliced bread."
The political significance of bread is considerable. In Britain in the nineteenth century the inflated price of bread due to the Corn Laws caused major political and social divisions, and was central to debates over free trade and protectionism. The Assize of Bread and Ale in the thirteenth century showed the importance of bread in medieval times by setting heavy punishments for short-changing bakers, and bread appeared in Magna Carta a half-century earlier.
In contrast, in various parts of Asia rice is much more prominent as a staple and much of the connotations of bread as a cultural symbol of basic necessities are replaced by rice. To the more conservative elderly generations of Chinese in southern China, the appearance of rice on the table is a fundamental constituent of a meal - in contrast to central and northern China, where wheat products are the main staple (since only the warm sub-tropical climates of southern China is suitable to growing rice).
Text 6. Bread in Nothern and western Europe.
Around the world bread is a staple in almost every single diet. Throughout history bread has been recognized as an important part of society's survival. There have been wars started over the land on which the grains grow that are used to make the breads of a country or region.
Breads come in many forms, they can contain leavening or not. Bread can be grilled, baked, boiled, and fried. They can be loaf shaped, flat, square, round, long and shaped like a wreath. They all have some sort of grain or flour in their ingredients; it can be ground chickpeas as in Roti, corn as in Tortillas, dark rye as in Pumpernickel or wheat as in Baguettes.
Breads are consumed with every meal of the day, not to mention for snacks. For breakfast we may think of Bagels, Croissants, Biscuits, Muffins, or Scones. Lunches may contain sandwiches made with Ciabatta, Pita, Cuban, Pumpernickel or Rye. For our supper we commonly see baskets containing Rolls, Bread Sticks, Focaccia, or Naan. We also eat bread for snacks such as pretzels that come in both soft and hard varieties and it maybe a slice of fruit or vegetable breads like zucchini, banana or cranberry.
Here are some more of the world's breads:
-
Corn Bread: No visit to the American south is complete until you eat 3 things, namely BBQ, grits and delicious, buttery Corn Bread.
-
Cuban Bread: This crunchy bread is the base for the mouthwatering Cubano, or Cuban sandwich, in which ham, roast pork, cheese and pickle achieve apotheosis.
-
Focaccia Bread: Thick, warm, doughy and flavorful, this predecessor of pizza dough is the best thing the Mediterranean has produced since democracy.
-
French Bread: The ultimate dinner-bread, and what a shape; between baguettes and the Eiffel Tower, it's no wonder Paris is though of as the city of love.
-
Fry Bread: This Native American bread is so much a part of modern Indian culture it's practically a culture hero…and it's also delicious.
-
Irish Soda Bread: There are a million variations of this staple of the Emerald Isle, but the simple, yeast-free original has been pleasing pallets since the 1840's.
-
Italian Bread: The other ultimate dinner bread, perfect with a little butter, a little cheese, maybe some garlic and/or tomato sauce and a box of antacids.
-
Naan: Scrumptious flat bread that no Indian meal can do without and a way to relieve the sting when you tell the chef you want the really spicy curry.
-
Pita Bread: This falafel pocket from the Promised Land is adaptable and yummy, and keeps the food in your hand and not on you pants.
-
Rye Bread: This dark and hearty bread comes from Germany, and is the perfect match for Black Forest Ham.
This travel across the world of breads leaves the reader hungry and ready for a snack.
Text 7. The serving of bread.
There are so many ways to serve bread, but it is so easy to overlook them! One of the most popular ways to serve bread is as part of a sandwich. Everyone loves sandwiches and bread is the mainstay of this food. Another way to serve bread is to simply slice it and serve with butter as an accompaniment to any meal. Many restaurants serve bread this way and it helps clients stave off their hunger until their meal is served. Another way bread may be served is as French toast. Simply dip the bread in an egg batter, grill, and serve! Bread is necessary to make homemade croutons and really adds some flavor to salads. An additional idea for ways to serve bread includes making bread crumbs and breading chicken, pork, or beef and then frying it. You can even use bread to make bread pudding! There truly are endless ways to serve bread and if you just think about it you will find a tasty and creative way to serve the bread you have on hand.
Andrea Cespedes is a professionally trained chef who has focused studies in nutrition. With more than 20 years of experience in the fitness industry, she coaches cycling and running and teaches Pilates and yoga. She is an American Council on Exercise-certified personal trainer and has degrees from Princeton and Columbia University.
Bread counts as part of the grain food group on the U.S. Department of Agriculture's Food Guide Pyramid. The USDA recommends six to 12 1-oz. servings of bread or other grains daily for optimal health and energy. Understanding what counts as a serving of bread can help you meet your daily needs for these important foods.
Bakery Bread
A regular slice of sourdough, white, wheat or rye bread weighing 28 g counts as one serving. A small slice of French bread or four slices of snack-size rye bread also count as one serving. If you choose corn bread, a small piece measuring about 2 ½ inches by 1 ¼ inches by 1 ¼ inches also counts as a serving.
Bagels, Muffins and Biscuits
Many commercial bagels count for as many as four servings of bread. A minibagel, however, is equal to just one serving. A whole English muffin is equal to two servings of bread. Bakery muffins, such as bran or blueberry, count as one serving, as long as they are just 2½ inches in diameter. Most bakery muffins are far larger, providing three or more servings each. A small biscuit can also count toward your daily grain servings. Look for ones measuring about 2 inches in diameter.
Flat Breads
A flour, wheat or corn tortilla that's 6 inches in diameter equals one serving of bread. The large burrito-sized tortillas at the local Mexican take-out restaurant are actually equal to about four bread servings. Half of a large 6-inch pita counts as one serving.
Considerations
Choosing whole wheat or whole grain bread can help you meet the minimum 3 oz. of whole grains recommended daily by the USDA. Whole grains provide fiber for healthy digestion and cholesterol levels, along with B vitamins. Some breads advertise themselves as containing whole grains when in reality they are mostly made of refined white flour. To ensure that you get the most whole grains possible, make sure your bread's label lists a whole grain - such as 100 percent whole wheat flour, barley, rye or oats - as the first ingredient.
Text 8. Producing of pasta.
Semolina flour is more course and makes the dough a little tough and leathery so for your first attempt I suggest you put together a blend of both flours to make it manageable and delicious.
Ingredients:
-
1½ cups All purpose flour
-
¼ cup Semolina flour
-
2 eggs
-
1 tsp Salt
-
1 tsp Olive Oil
Place flour in a pile in the center of a large cutting board or counter top and make a well in the center of the flour.
Crack the eggs into the center of the well and add the olive oil and salt. (see my flavored pasta link below to add delicious natural flavors to this step).
Take a fork and begin to beat the eggs and other ingredients right in the center of the well. Slowly mix in the flour as you blend and beat until the mixture is blended enough to dig in with your hands.
If this is your first attempt and you feel better putting the wet ingredients into a separate bowl and mixing and blending in the bowl first you can do that. Then pour the mixture into the well and begin blending together.
When it becomes pasty you can dig in with your hands. Keep adding either extra flour handy to keep in from sticking or even a little bit of water if it's too stiff.
Once the ball of your basic pasta dough is firm and manageable you can begin kneading. This is a very important step to the process. It makes the dough tender. There is a technique to kneading homemade pasta dough. It's a process worth pending time with.
Start by taking the heel of your palm and rolling the dough out with your fingers pointed up.
Now take the dough and with your knuckles and both hands push your pasta dough back into the shape of a ball. Then repeat rolling it out with the heel of your palm. Continue to do these steps for 10-15 minutes. The more you knead the more flexible the pasta dough becomes when it rests. Put time into this step. It's worth it.
Now place the ball into a bowl and let is sit covered with a plastic wrap for about ½ to an hour or put it into a plastic bag. The pasta dough should rest for about an hour. It needs a break.
Roll out the dough to a ½ inch thick blob. (It's the only word I could think of.)
Keeping it in a square shape as much as possible. Cut the dough into three to four inch squares. It doesn't have to be an exact science. Set the pasta maker to the highest setting and run the dough through 2 times. Keep doing that as you lower each setting.
I typically don't go lower then a number two or number three setting for Semolina pasta. I use a number three setting for the all purpose flour pasta dough recipe because it's more delicate.
However, if you are using your pasta dough recipe to make a stuffed pasta, you can make it thinner.
Your final run will be cutting it with the pasta maker machine to make fettucini or spaghetti.
If you are making a pasta shape you roll out the dough in the pasta machine and use a ravioli maker or ravioli cutter. More on this step soon!
Text 9. Cooking caramel.
The softer caramel products, such as this recipe for caramel sauce, contain fat and liquid in addition to the caramelized sugar. To create the texture of caramel sauce, you need a 1:1 ratio of fat and liquid. In this recipe, heavy cream (40% fat) is used along with butter to achieve the 1:1 fat:liquid ratio. If you want to substitute milk you will need to use less milk and more butter to keep the ratio. You can also substitute soy-milk and margarine to make a vegan caramel sauce, but make sure to keep the fat:liquid ratio.
This recipe makes approximately 6 cups of caramel sauce. You can easily halve this recipe if you wish. It takes 30-60 minutes depending how quickly you are evaporating the water. If sealed in clean canning jars, the sauce can be stored for 3 months without refrigeration. Or store refrigerated for up to 6 months.
Ingredients:
-
2 Cups Water
-
4 Cups Sugar
-
2 Tbsp Corn Syrup (optional)
Pinch Salt
-
2 Cups Heavy Whipping Cream
-
1/2 Cup (1 stick) Unsalted Butter, chopped into 1" cubes
Safety:
Adding liquid to sugar that is over 300°F is dangerous! Some of the liquid will immediately flash to super-hot steam. To avoid steam burns, stay back from the pot and pour liquids at arms length. Use an oven mitt for your hand.
When you add your liquid to the hot sugar, it will boil violently. To avoid messy and dangerous boil-overs, a 2.5 quart heavy bottomed sauce pan or pot is the minimum, but 3-4 quarts is recommended
Use a heat proof spatula or spoon such as wood or silicone.
Directions
Dissolve the water, sugar and corn syrup over medium high heat until fully dissolved.
Stop stirring and let the solution boil over medium heat. Check on the solution every 5 minutes. You will see the bubbles slow down and get larger. When the bubbles begin to reach 1/2" to 3/4" start monitoring the solution frequently.
When the solution begins to turn amber, get your cream and butter and watch it constantly.
When the solution has turned a shade of caramel that you like (darker is deeper and will start to take on a little bitterness), step back and add the cream at arms length, stirring constantly and scraping the sides of the pan.
Add the butter and stir until incorporated. Pour the sauce into a serving dish for immediate serving with bread, drizzled on ice cream, as a garnish or for use in other desserts.
If you desire, follow standard canning procedures and distribute into canning jars. Allow to cool until the buttons are depressed. Any jars with buttons that are not depressed should be refrigerated and consumed first. To reheat the caramel sauce, microwave the jars (without covers) for 10-30 seconds depending how soft and hot you want it.
Text 10. Other caramel options.
The following are all variations that can be made at different stages of the recipe above.
Simple Syrup The first step in the recipe was to dissolve two parts sugar in one part water. This creates a simple syrup, perfect for sweetening cold drinks (e.g. Iced Tea) without having to wait for granulated sugar to dissolve.
Caramel Chews Replace the cream with 3/4 Cup Half & Half. Pour the hot mixture onto a silicone mat or parchment paper to cool. When it is cool enough to handle, fold and knead the caramel a few times, then break into bite size pieces. Allow to cool completely before wrapping individually.
Turtles Replace the cream with 3/4 Cup Half & Half. Pour the hot mixture over 4 cups of your favorite nut on a silicone mat or parchment paper to cool. When it is cool enough to handle, fold and knead the caramel until the nuts are fully distributed, then break into bite size pieces. Melt chocolate over a double boiler or in the microwave and dip the turtles or simply drizzle chocolate on top.
Toffee Instead of cream, use 7 sticks of butter (a total of 8 sticks or 4 cups, so you have equal parts butter and sugar). Mix in chopped nuts if desired. Pour onto a silicone mat or parchment paper or molds. After cool drizzle or dip with chocolate and chopped nuts.
Nut Brittle Do not use any cream or butter. Stir in 1/2 tsp. baking soda (optional), then pour the molten caramel over 4 cups of your favorite nuts on a silicone mat or parchment paper and let it cool. When it has reached room temperature, break it up with a mallet or by dropping the sheet on the counter. Wrap and store in an air-tight container.
Sugar Art You can do this at any point during the hard crack or caramel stages. Remove the sugar from the heat and allow to cool for one minute. Using a spoon, let the syrup drip off. If it drips in globs, let it cool longer. If it drips in a continuous stream, you can start making art. Drizzle the syrup in patterns over a silicone mat or parchment paper and allow to cool, then carefully peel off. Or, spray bowls and other (clean) objects with cooking spray and drizzle the syrup to create domes and other shapes. Allow to cool to room temperature, then serve soon or store in an air tight container. These will eventually soften and droop from humidity in the air.
Chocolate is a range of products derived from cocoa (cacao), mixed with fat (i.e. cocoa butter and/or plant oils) and finely powdered sugar to produce a solid confection. There are several types of chocolate according to the proportion of cocoa used in a particular formulation.
The use of particular name designations is sometimes subject to governmental regulation.
Text 11. Cooking chocolate.
Making chocolate from the bean isn't easy. Chocolate companies invest millions of dollars into tools and machinery to turn bitter cacao beans into delicious chocolate bars. But with many hours -- or possibly days -- of hard work and dedication to detail, along with some equipment of your own, you can turn your kitchen into a miniature chocolate factory! By following these instructions and techniques, you'll be able to make your very own brand of chocolate.
![]() Roast the cocoa beans. The process is similar to roasting coffee beans, except with gentler requirements: 5-35 minutes at temperatures between 120-160 degrees C(250-325 degrees F). You must generally expose the beans to an initial high temperature, lower the temperature gradually, and stop roasting when the beans start to crack (but not burn). The first image shows the cocoa beans before roasting, and the second image shows the after-result. You can accomplish this in your oven or by using a store-bought roaster.
Roast the cocoa beans. The process is similar to roasting coffee beans, except with gentler requirements: 5-35 minutes at temperatures between 120-160 degrees C(250-325 degrees F). You must generally expose the beans to an initial high temperature, lower the temperature gradually, and stop roasting when the beans start to crack (but not burn). The first image shows the cocoa beans before roasting, and the second image shows the after-result. You can accomplish this in your oven or by using a store-bought roaster.
![]() If roasting in your oven, you will need to do a bit of experimenting because roasting times depend on the type of bean you're using. Lay the beans in a single layer across a cookie sheet. Start off with an 18 minute roast in a preheated oven at 120 degrees C (250 F). They'll be ready when they start to crack and when they actually taste like chocolate (let them cool before tasting!).
If roasting in your oven, you will need to do a bit of experimenting because roasting times depend on the type of bean you're using. Lay the beans in a single layer across a cookie sheet. Start off with an 18 minute roast in a preheated oven at 120 degrees C (250 F). They'll be ready when they start to crack and when they actually taste like chocolate (let them cool before tasting!).
For roasting larger quantities of cocoa beans, you may want to invest in a drum, which is rotated over a gas grill.
For roasting larger quantities of cocoa beans, you may want to invest in a drum, which is rotated over
Crack and winnow the beans. After roasting, the beans must be cracked into nibs and winnowed, whereby the husks (chaff) are removed.
-
You can crack the beans with a hammer and remove the husks (which should be loose after proper roasting) by hand if you are working with a small batch.
-
For larger batches, you can use a very coarse, Corona type mill or purchase a specialized mill [1] (shown here, also see Citations below) to crack the beans into nibs. (In case you were wondering, a meat grinder doesn't work.)
To winnow the nibs, stir them gently with your hands or a spoon as you blow on them with a hair dryer or small shop vac until the husks are blown away.
Grind the nibs into a cocoa liqueur. You will need equipment strong enough to liquefy the nibs and separate the remaining husks. General food processors, Vita-Mix, coffee grinders (burr and blade), meat grinders (manual and electric) mortar and pestles, and most juicers will not work. You may need to experiment to find equipment that gets the job done. Many home chocolatiers find success with a "Champion Juicer"[2] (see Citations below). Feed the nibs into the juicer one handful at a time, being sure to push them in gently (not forcefully) or else the motor may overheat. Cocoa liqueur will come through the screen and a mixture of husks and liqueur will find its way through the spout. Feed this mixture through the juicer again until only the husk comes through the spout.
Conch and refine the chocolate. By definition, conching affects the characteristic taste, smell and texture of the chocolate, while refining reduces the size of the cocoa solids and sugar crystals. Both processes can be applied at the same time with a powerful wet grinder (success has been reported with a Spectra 10 melanger, also called the "Stone Chocolate Melanger"[3]; see Citations below). How you conch and refine the chocolate will depend on what equipment you use, but here are guidelines for the Spectra 10 melanger:
-
Melt the chocolate and the cocoa butter in the oven to about 120 degrees F.
-
Combine with non-fat dry milk powder, sugar, lecithin and a vanilla pod (split and soaked in the cocoa butter 1 hour; this is an optional flavoring).
-
Pour the chocolate mixture in the grinder, periodically pointing a hair dryer at it for 2-3 minutes to keep the chocolate melted during the first hour (until the friction created by grinding keeps the chocolate liquid without additional heat being needed).
-
Continue refining for at least 10 hours and no more than 36 hours, until the chocolate tastes smooth and balanced, but be sure not to over-refine (or it will get gummy).
-
To take a break from refining (e.g. at night while you're sleeping, see Warnings), turn off the grinder, put the covered bowl into an oven that's preheated to 150 degrees F but turned off, and leave it there overnight. It shouldn't solidify but if it does, take the cover off and turn the oven on to about 150-175 degrees F until the chocolate melts (be careful not to let the bowl itself melt, though).