- Преподавателю
- Информатика
- Computer scince lesson Excel. The main actions and concepts
Computer scince lesson Excel. The main actions and concepts
| Раздел | Информатика |
| Класс | 8 класс |
| Тип | Другие методич. материалы |
| Автор | Калиев Д.С. |
| Дата | 30.01.2016 |
| Формат | doc |
| Изображения | Есть |

"Excel. The main actions and concepts."
Objectives:
1. To acquaint students with the basic concepts spreadsheet.
2. Develop skills for working with spreadsheets.
3. Raise interest in the subject.
The course of the lesson:
Check homework.
Microsoft Excel spreadsheet allows the data the following steps:
• Create tables and save them, give them names.
• Open the saved table and edit them.
• Add table rows, columns and cells.
• Copy and move the contents of the rows, columns, cells.
• Sort the contents of cells in ascending or descending order.
• Perform calculations using formulas.
• Create a table according to the diagram and paste them into the table.
• Insert a table graphics.
• Display tables for printing.
To start Microsoft Excel, run the following command:
Start -> Programs -> Microsoft Excel. On the screen, while there is a window of the program.
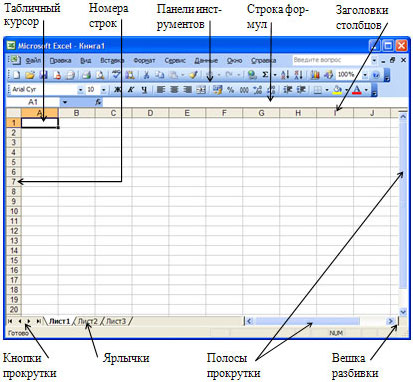
The main elements of the window are as follows:
Scrollbar - allows you to see those parts of the table, which is not currently visible on the screen (click on the arrows or move the slider).
Split box - split a window table in two parts, allowing you to work on both sides of the table. To use the line split split box, drag with the mouse to the right place table.
Number lines - each line is determined, and can be used to select rows (by clicking on the title).
Column header - defines each column and can be used to select the columns (click on the title).
Cell pointer - points to the selected (or active) cell.
Labels - used to select the worksheet in the workbook.
Toolbar - contains buttons for the most frequently used commands.
Formula Bar - displays the entire contents of the active cell.
What we see after running Excel - this worksheet table. All worksheets are united in a workbook. Workbook page by default contains 3 sheets of worksheets that are saved to disk as one file. Number of worksheets can be increased to 255 in one book.
Worksheet is organized into rows and columns. Each leaf consists of 256 columns and 65536 rows. Columns are identified by Latin letters. Rows are numbered. At the intersection of rows and columns are the cell. They are identified by coordinates (A1, B2, etc.). In addition to worksheets, spreadsheets, Microsoft Excel workbook can contain sheets of diagrams, lists of modules, macro sheets and dialog sheets.
Questions and tasks:
1. How to turn spreadsheet Microsoft Excel?
2. Name the parts box Excel.
3. How many rows and columns contains a worksheet?
Homework: Pp. 166-168
• Lesson 60. "Excel. Formatting and Printing Spreadsheets"
Topic: "Excel. Formatting and Printing Spreadsheets".
Objectives:
1. Teach students to format and print tables and Excel.
2. Develop skills for working with spreadsheets.
3. Raise educational interest.
The course of the lesson:
Check homework.
To change the appearance of the table, for example, to allocate its cap or detach the side line, you can apply the operation of the automatic formatting. To do this, follow these steps:
1. Place the cursor in a table cell.
2. Run the command: Format -> AutoFormat.
3. In the dialog box "Auto", select any file format and click OK.
If you do not like none of the formats, you can draw lines by using the buttons: located on the Drawing toolbar. If the Drawing toolbar is not enabled, it can be enabled with the command:
View -> Toolbars -> Drawing or buttons: on the Standard toolbar.
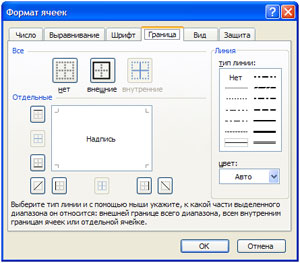
There is another way to format tables. To use this method, follow these steps:
1. Select the cell or group of cells.
2. Run the command: Format -> Cells.
3. In the dialog box, Format Cells, select the tab "Border".
4. Select your desired color, line type and the right border.
5. Click the OK button.
To display a table to print one copy, simply click on the button on the Standard toolbar.
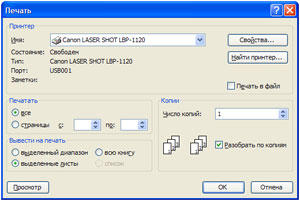
If you want to print multiple copies or any portion of the table, follow these steps:
1. Highlight the portion of the table you want to print.
2. Execute the command: File -> Print.
3. In the Print dialog box, specify which part of the document you want to print or a page range and click OK.
Questions and tasks:
1. How do I change the look of a table?
2. What are some ways you can format a table?
3. How to display a table to print?
Homework: Pp. 183-188.